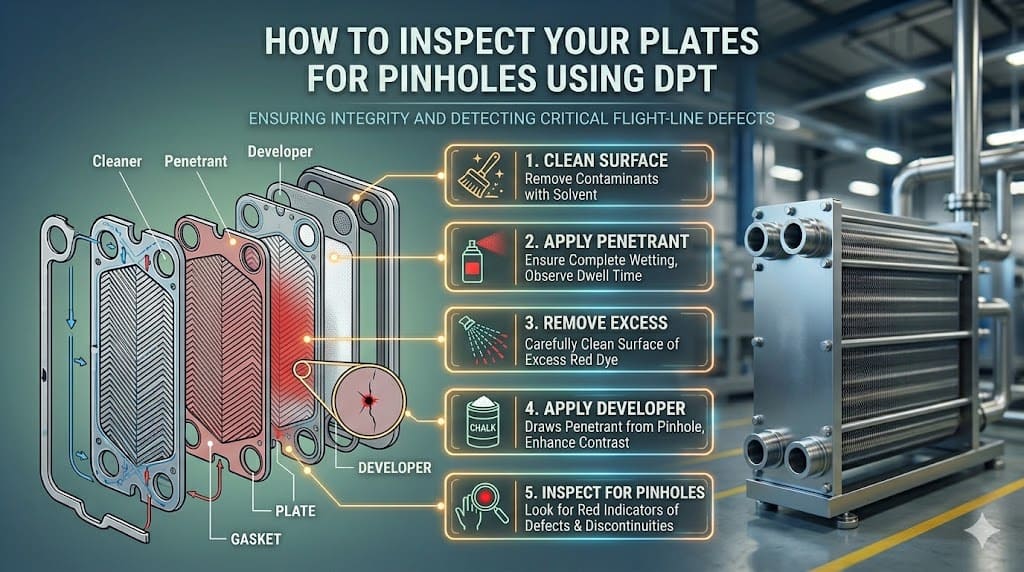
Hidden pinholes in your heat exchanger plates1 cause leaks. You lose money and face sudden shutdowns. Dye penetrant testing finds these tiny flaws before they ruin your system.
Dye penetrant testing2 (DPT) is a clear method to find pinholes in heat exchanger plates. You clean the plate, apply a red penetrant, wait, wipe it off, and spray a white developer. The developer pulls the red dye out of cracks, showing exactly where the damage is.
Many people think testing plates is a quick and simple job. They just spray the chemicals and hope for the best. But doing it wrong gives you false results3. I have seen many plants suffer because of bad testing habits. If you miss a tiny hole, the aggressive fluids will mix. Let us look at the right way to inspect your plates and keep your factory running safely4.
Why Must You Clean Heat Exchanger Plates Before Testing?
Testing dirty plates is a waste of time. The dirt hides the real damage. You must clean the plates first to stop unexpected leaks in your system.
You must completely clean the plates before applying dye penetrant. If scale or oil blocks a pinhole, the penetrant cannot enter due to surface tension. The test will falsely show the plate is good. Always use ultrasonic or deep chemical cleaning first to expose the bare metal.
The Danger of Testing Dirty Metal
I often visit plants and watch workers spray penetrant straight onto dirty plates. This is a huge mistake. We want to test the strength of the metal. We do not want to test the sealing power of the dirt. When a heat exchanger works for months, hard scale and thick oil cover the plates. This dirt fills up small cracks.
Surface tension stops the liquid dye from pushing past the dirt. The red dye just sits on top. When you wash the dye away, the plate looks perfect. But it is not. The hole is still there. It is waiting to break open under high pressure.
At TIVO5, we never test dirty parts. We always do a deep clean first. We use chemical baths or ultrasonic cleaners. This removes every bit of dirt. Only then can you see the real state of the metal.
Here is a simple look at the difference between cleaning methods:
| Cleaning Method | Dirt Removal Level | DPT Result Accuracy | Best Use Case |
|---|---|---|---|
| Simple Water Wash | Low | Very Poor | Never use for DPT |
| Manual Wire Brush | Medium | Fair | Quick checks |
| Deep Chemical Bath | High | Excellent | Heavy scale removal |
| Ultrasonic Cleaning | Very High | Perfect | Catching 0.01mm cracks |
If you test a dirty plate, you are tricking yourself. Always start with bare, clean metal.
Does Temperature Change Your Dye Penetrant Testing Time?
Following a fixed timer can ruin your test. Cold workshops make the liquid thick. You must extend the waiting time to catch dangerous cracks before they leak.
The penetration time is not a fixed 10 minutes. In cold winter workshops under 10°C, the penetrant viscosity increases. It enters pinholes much slower. You must extend the waiting time to 20 minutes or more. Proper temperature control6 ensures you catch microscopic 0.01mm fatigue cracks.
Adjusting Time for Cold Environments
Many maintenance workers read the bottle instructions and set a strict 10-minute timer. I used to do this too. But I learned a hard lesson during a winter project in a cold factory. The temperature was near freezing. We waited 10 minutes. We washed the plates. We found nothing. Later, those same plates leaked.
Temperature changes how liquids behave. When the air is cold, the red dye becomes thick. We call this high viscosity. A thick liquid moves slowly. It needs more time to squeeze into tiny holes. If the room is under 10°C, a 10-minute wait is simply not enough.
At TIVO, we build 100% compatible spare parts for global brands. Our standard requires testing in a warm room or adding extra time based on the cold. We must catch cracks as small as 0.01mm.
You must adjust your testing time to match the room temperature. Use this guide:
| Workshop Temperature | Penetrant Condition | Required Wait Time | Risk of Fixed 10-Min Timer |
|---|---|---|---|
| Above 20°C (68°F) | Thin and fast | 10 minutes | None |
| 10°C to 20°C | Normal | 15 minutes | Might miss deep cracks |
| Under 10°C (50°F) | Thick and slow | 20+ minutes | Will miss 0.01mm pinholes |
Never rush the test in the cold. Give the liquid the time it needs to do its job.
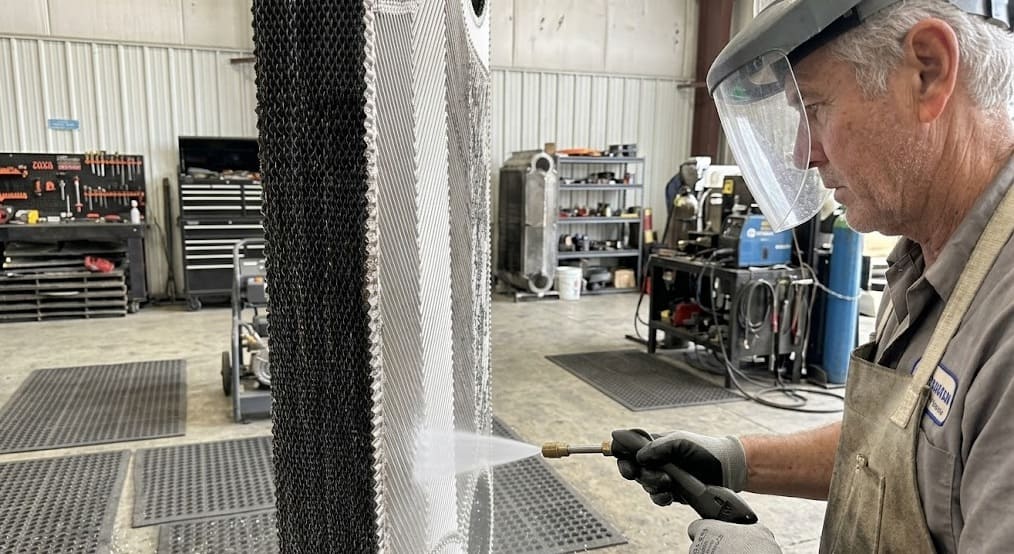
How Do You Apply Developer to Find Hidden Pinholes?
Spraying the developer wrong hides the truth. Thick spray covers the red marks7. You must apply a thin layer to pull the dye out and find leaks.
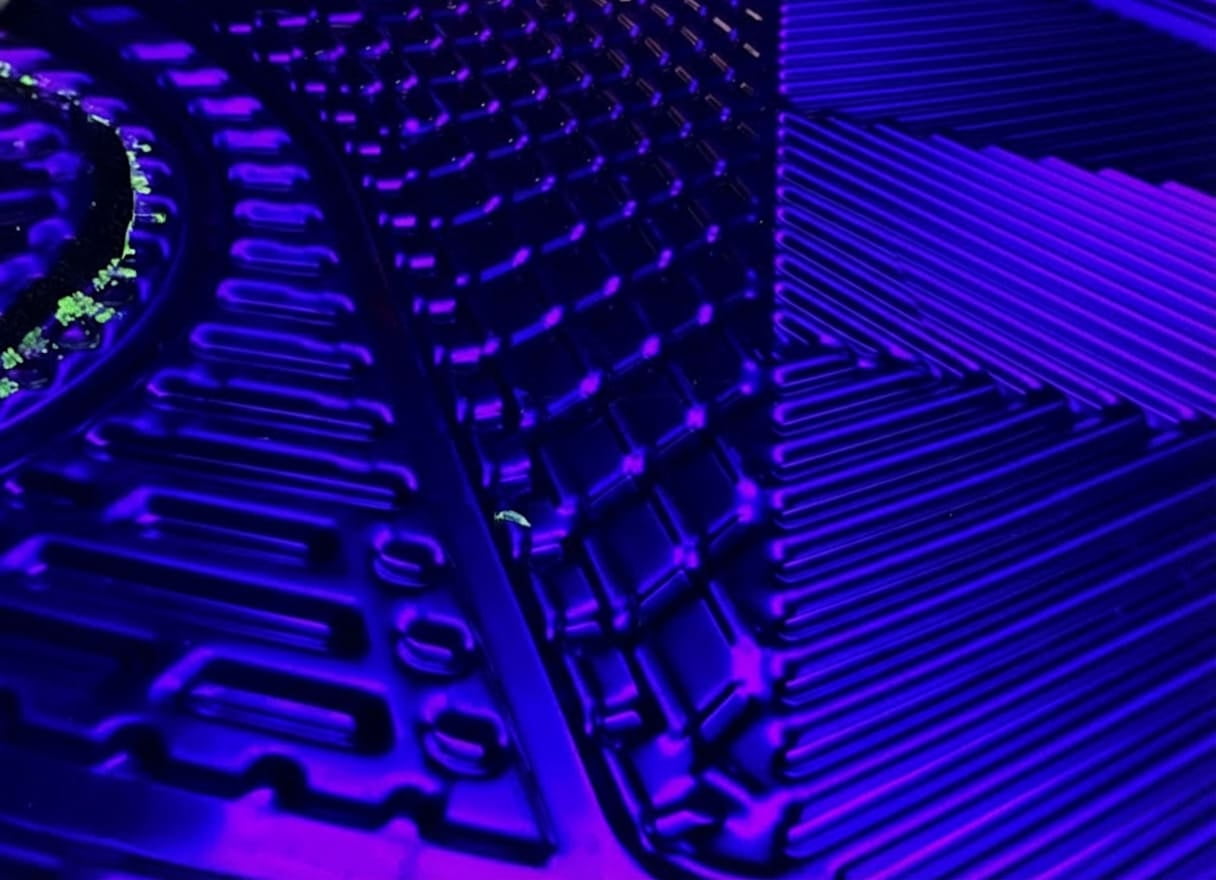
The white developer is not just a background. It acts like blotting paper. It uses capillary action to suck the red dye out of the holes. You must spray a thin and even layer. Watching the red color bleed out tells you the depth of the hole.
The Blotting Paper Effect
Applying the white developer spray8 is a skill. I have watched new workers spray it on thick. They act like they are painting a wall. This is a bad idea. If the white layer is too thick, it acts like a blanket. It traps the tiny red dots underneath. You will not see them.
If you spray too little, nothing happens. The developer works just like blotting paper. It creates a suction force called capillary action. This force pulls the trapped red dye out of the metal crack. It brings the dye up to the surface.
You need a very thin and even coat. When you do it right, you can watch the red color slowly grow on the white surface. We call this process "bleed-out." The speed and size of the bleed-out tell you how deep the hole is. A big, fast red spot means a deep hole.
Here is how different spray methods affect your test:
| Developer Spray Method | Suction Force | Visibility of Red Dye | Final Test Result |
|---|---|---|---|
| Too Thick (Heavy coat) | High | Poor | False Pass |
| Too Thin (Light dust) | Weak | Poor | False Pass |
| Thin and Even Coat | Strong | Excellent | Accurate Detection |
Take your time with the spray. It is the only way to make the hidden damage visible.
What Do Red Marks Tell You About Heat Exchanger Damage?
Seeing a red mark is scary. Ignoring what it means is worse. You must find the root cause to stop your new replacement plates from failing too.
Dye penetrant testing shows you the exact type of damage. Round red dots mean pitting, which comes from fluid corrosion. Red lines mean cracks, which come from pressure pulses9 or uneven stress. Knowing the difference helps you fix the real problem in your system.

Finding the Root Cause of Plate Failure
Finding a leak is only half the job. You must understand why the plate broke. If you do not fix the main problem, you will just destroy the next set of plates. The shape of the red mark gives you the answer.
When I inspect plates, I look closely at the shape of the red dye. If I see small round dots, I know it is pitting. Pitting usually happens because the fluid is too aggressive. The water quality might be bad. The chemical level might be too high.
If I see red lines, I know it is a crack. Cracks usually happen at the corrugation support points. This means the pressure in the system is jumping up and down. The pump might be causing pressure pulses. The plates might be feeling uneven stress.
At TIVO, we study the wear on the plate corrugations to help our customers. We tell them exactly what to fix.
| Red Mark Shape | Damage Type | Common Root Cause | Action Needed |
|---|---|---|---|
| Round Dots | Pitting | Corrosive fluids | Improve water treatment10 |
| Straight Lines | Cracks | Pressure pulses | Adjust pump frequency |
| Star Shapes | Stress Cracks | Uneven tightening | Follow correct manual |
Do not just throw away the broken plate. Use the red marks to learn about your system and make it safer.
Conclusion
Clean your plates, adjust testing time for cold weather, spray developer thinly, and analyze the red marks. These simple steps will keep your heat exchangers running safely and efficiently.
Learn about heat exchanger plates and their critical role in industrial processes. ↩
Explore this resource to understand the fundamentals of dye penetrant testing and its importance in detecting flaws. ↩
Understand the risks associated with inaccurate testing results and their impact on operations. ↩
Explore best practices for maintaining safety and efficiency in industrial operations. ↩
Explore TIVO's expertise in heat exchanger solutions and their commitment to quality testing and maintenance practices. ↩
Explore the impact of temperature on testing accuracy and the importance of proper control. ↩
Understand the significance of red marks and how they help identify types of damage. ↩
Learn the correct techniques for applying developer spray to ensure accurate detection of flaws. ↩
Explore the effects of pressure pulses on heat exchanger integrity and performance. ↩
Discover the importance of proper water treatment in preventing damage to heat exchangers. ↩